The 2nd principle of the SOLID principle is the "Open Closed" principle. The open closed principles instructs us that our code should be open for extension, but closed for modification.
By applying this principles we protect our application from breaking in case we are required to further extend it.
So how can we set up our applications in such a way, that our code is open extension, but closed for modification?
Transfer logic to another artifact
We can build our application in such a way, that our artifact which we build according to the "Open Closed" principle remains untouched whilst still giving us the possibility to modify it's behavior.
The ServiceNow platform already provides several tools and solutions out of the box.
User field widget example
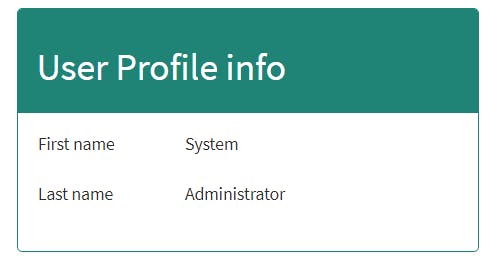
Let's start our demonstration with a very simple custom widget. The User Profile widget is showing information of the logged in user.

Our HTML has 2 rows. One row is showing the first name. The 2nd row is showing the last name.
<div class="panel panel-primary">
   <div class="panel-heading">
      <h2>User Profile info</h2>
   </div>
   <div class="panel-body">
      <form>
         <div class="form-group row">
            <label class="col-sm-4 col-form-label">{{data.firstName.label}}</label>
            <div class="col-sm-8">
               <label>{{data.firstName.display_value}}</label>
            </div>
         </div>
         <div class="form-group row">
            <label class="col-sm-4 col-form-label">{{data.lastName.label}}</label>
            <div class="col-sm-8">
               <label>{{data.lastName.display_value}}</label>
            </div>
         </div>
      </form>
   </div>
</div>
Our server script contains a a GlideRecord to fetch the logged in user. Then we are using the out of the box $sp.getField method to fetch and assign the logged in user information to the data object.
(function() {

    var userId = gs.getUserID();

    var grUser = new GlideRecord('sys_user');
    grUser.get(userId);

    data.firstName = $sp.getField(grUser, 'first_name');
    data.lastName = $sp.getField(grUser, 'last_name');

})();
Now imagine that tomorrow you need to further extend the functionality with more fields. Our current implementation does not allow us to achieve this without modifying both the HTML and server.
In the HTML we need to add a new HTML section
In the server script we need to add an additional line containing the GlideRecord.
This breaks the Open closed principles. So how can we solve this?
Making the HTML respect the open closed principle
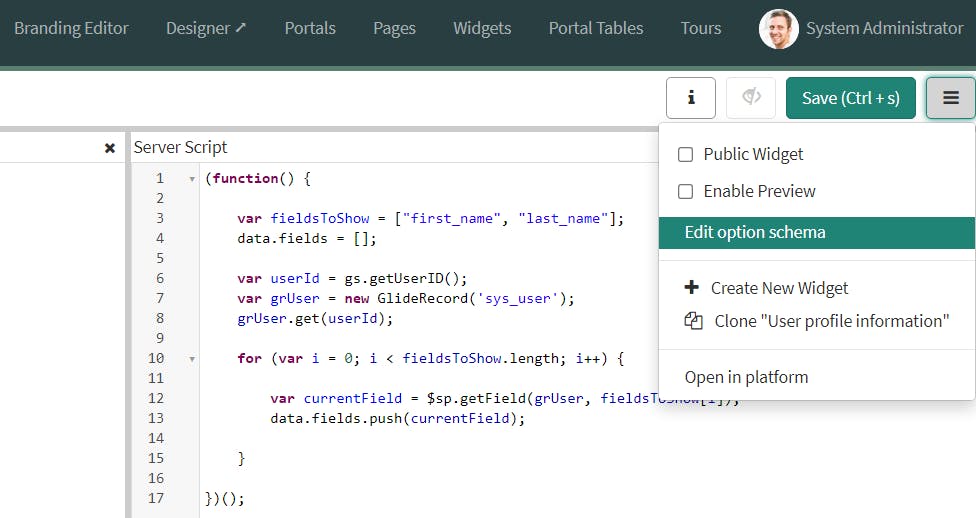
Let's start by modifying our server script in such a way that we can dynamically add more fields.
(function() {

    var fieldsToShow = ["first_name", "last_name"];
    data.fields = [];

    var userId = gs.getUserID();
    var grUser = new GlideRecord('sys_user');
    grUser.get(userId);

    for (var i = 0; i < fieldsToShow.length; i++) {
        var currentField = $sp.getField(grUser, fieldsToShow[i]);
        data.fields.push(currentField);
    }

})();
We added a new local variable "fieldsToShow" being an array of fields. This array will represent all the fields we want to show on our widget
We also added a new array "fields" on our data object. This will later on be used by our HTML.
var fieldsToShow = ["first_name", "last_name"];
data.fields = [];
We created a for loop that iterates over the the fields. The variables are being pushed into our data.fields.
    for (var i = 0; i < fieldsToShow.length; i++) {
        var currentField = $sp.getField(grUser, fieldsToShow[i]);
        data.fields.push(currentField);
    }
Now that all our fields are stored in the new data.fields array, we can update our HTML in such a way that we no longer need to modify the HTML content.
By using the ng-repeat attribute, we can dynamically load html elements on our page.
<div class="panel panel-primary">
   <div class="panel-heading">
      <h2>User Profile info</h2>
   </div>
   <div class="panel-body">
      <form>
         <div class="form-group row" ng-repeat="field in data.fields">
            <label class="col-sm-4 col-form-label">{{field.label}}</label>
            <div class="col-sm-8">
               <label>{{field.display_value}}</label>
            </div>
         </div>
      </form>
   </div>
</div>
Let's have a closer look at the HTML
<div class="form-group row" ng-repeat="field in data.fields">
We modified one of our div's to repeat for every element found in data.fields. In this case, that's all the fields we pushed in earlier in our data.fields array.
The "field" part of "field in data.fields" will store the element part of the iteration. This field variable can be used in our HTML just like we would in a for loop.
         <div class="form-group row" ng-repeat="field in data.fields">
            <label class="col-sm-4 col-form-label">{{field.label}}</label>
            <div class="col-sm-8">
               <label>{{field.display_value}}</label>
            </div>
         </div>
Here you can see how we are re-using the field variable in our HTML to dynamically show the label and display value of the field.
The result is the exact same widget, and it behaves the exact same like it did before. If in the future there would be a need to show more fields, we would be no longer required to touch the HTML part of our code, only modify the server script. At this point, we have succesfully converted our HTML to respect the open closed principle.
Now this is already a big improvement, but let's take it one step further. Because ServiceNow HTML & Server script are considered the same artifact, why don't we improve it so we don't have to touch our widget at all?
Converting the server script
We can achieve this by using the Instance options artifacts. Instance options allows system administrators to re-use widgets on different pages, whilst the behavior on each page could be different.
Let's create an Option Schema where we can configure the fields to be shown on the widget.
In the widget editor:
click on the hamburger icon and choose for "Edit option schema".

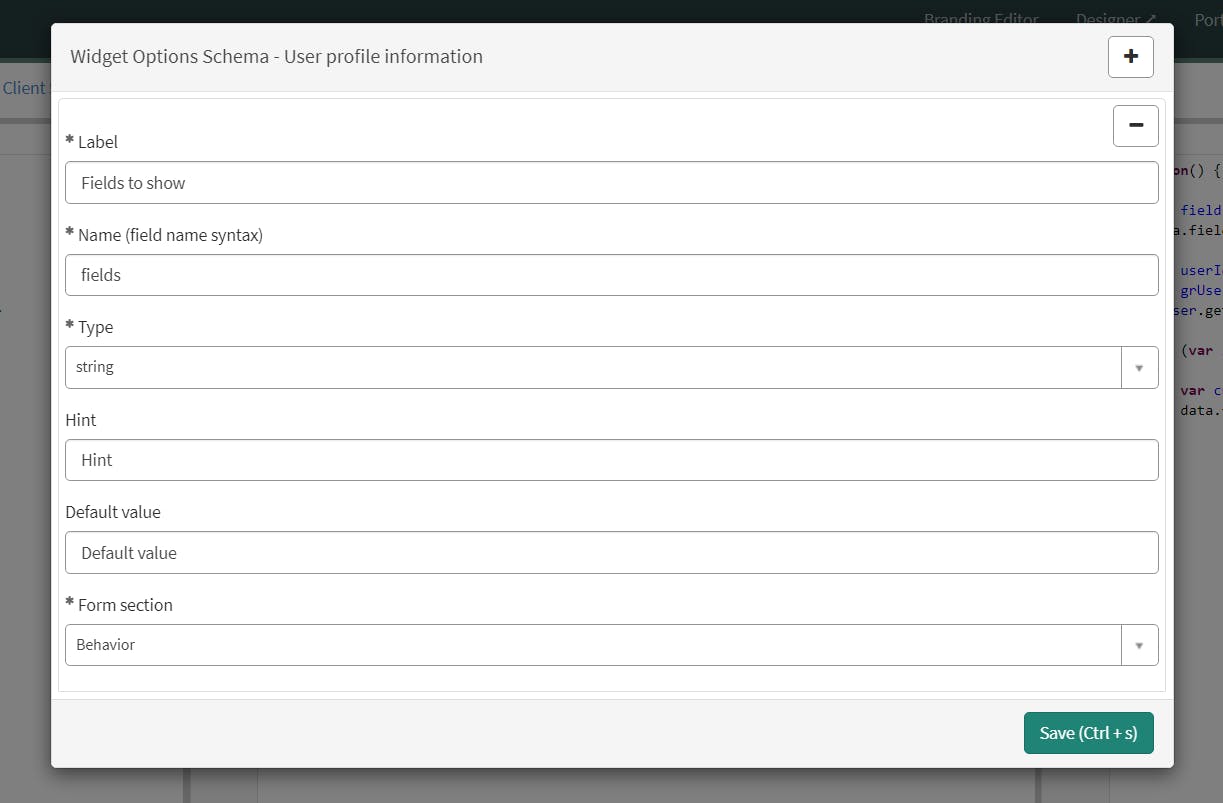
Click on the "+" in the top right cornor to add a new instance option.

We will create a new text field that will contain comma seperated list of all fields we want to show on our widget.
We use the following configuration:

Now let's rework the widget server script so we dynamically fetch the fields from our instance option instead. So instead of hardcoding our fieldnames in the array, we replace this part of the code to dynamically build an array based upon the input of our instance option.
var fieldsToShow = options.fields.replaceAll(' ','').split(',');
This line of code, removes any potential whitespaces of our instance option, then split the values based on the comma's present in the text.
Our final server script now looks like this:
(function() {

    var fieldsToShow = options.fields.replaceAll(' ','').split(',');
    data.fields = [];

    var userId = gs.getUserID();
    var grUser = new GlideRecord('sys_user');
    grUser.get(userId);

    for (var i = 0; i < fieldsToShow.length; i++) {
        var currentField = $sp.getField(grUser, fieldsToShow[i]);
        data.fields.push(currentField);
    }

})();
We have now fully converted our widget in such a way that extending it will no longer require us to update the widget itself.
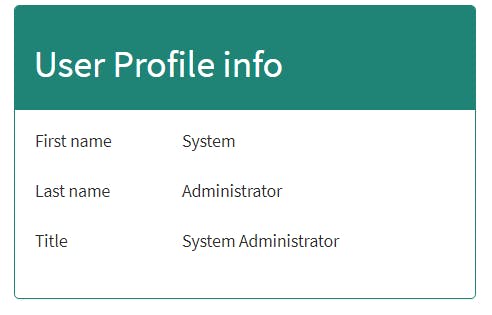
Let's configure the instance options now to load in an additional "title" field.
Open the widget on the portal.
Hold CTRL, right click on the widget and choose for instance options.
Now we add all fields comma seperated in the instance option.

Click on the save button.
Now we extended our fields without modifying the widget, and it looks like this:

Conclusion
We learned what the "Open Closed" principle means. We learned how we can design a service portal widget according to the Open Closed principles. Although in our example we only focused on a service portal widget, the principle can be applied amongst lots of other artifacts such as, Flows, Script includes and many more artifacts on the platform.

